


Faszinierend: Wie ein Comic entsteht
02. Februar 2006, 12:55 Uhr | Reportage
Der
kalifornische Comiczeichner
Kazu Kibuishi erläutert
in seinem Weblog Boltcity Schritt für Schritt die
Entstehung einer Seite seines Copper-Comics.
Kibuishi teilt seinen Job in drei Werkzeugphasen
ein:
Stift, Tusche, Computer. Am Anfang
steht eine grobe Bleistiftskizze, die er anschließend
als Blaupause auf »Bristol«-Papier überträgt. Mit
Tusche entstehen zuerst Sprechblasen, dann Rahmen und
schließlich die Figuren.
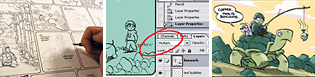
Dann digitalisiert Kazu Kibuishi den gezeichneten Comicbogen ziemlich umständlich mittels Flachbettscanner (6 Durchgänge) zu einer 4500 x 4500 Pixel großen PhotoShop-Datei. Das abschließende Kolorieren geschieht elegant am Computerbildschirm. Der großzügig bebilderte Workshop lässt keine Fragen offen. Gefunden im Agenturblog und bei Boingboing.
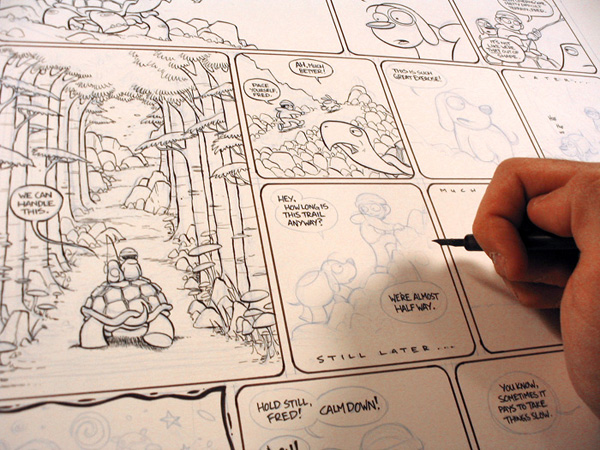
Phase 2, die Tuschezeichnung: »I make my way down the page from left to right, not necessarily in order, but in a way I can avoid running my drawing hand over the ink. Using the dip pen also means that the ink dries very slowly. Only a few years ago, this page would have been covered in process white to patch up all the smears left by my hand.«
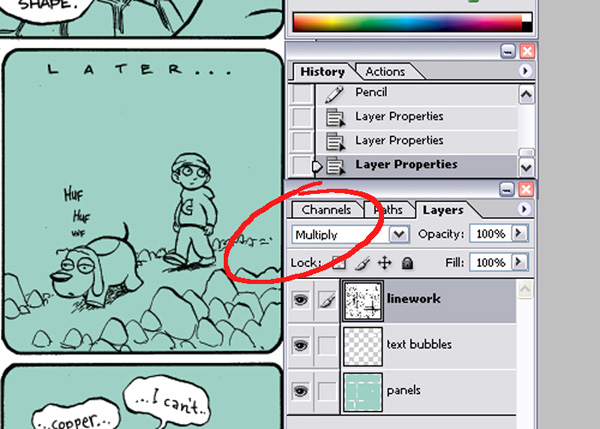
Phase 3, das digitale Kolorieren: »I begin the coloring process by going to Image>Mode>CMYK to make it a CMYK file, then I create two new layers. By double-clicking the background layer (the original scan) you can turn it into a regular layer and bring it to the top. I also rename it to keep things clean. Setting the linework layer to "Multiply" will allow for the white areas to become see-through while the blacks will stay visible.«
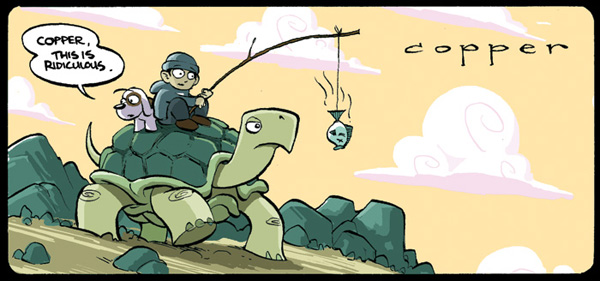
Der fertige Comic
Kazu Kibuishis Blog Boltcity ...
Der Schritt-für-Schritt-Workshop ...
Copper im Internet
Dann digitalisiert Kazu Kibuishi den gezeichneten Comicbogen ziemlich umständlich mittels Flachbettscanner (6 Durchgänge) zu einer 4500 x 4500 Pixel großen PhotoShop-Datei. Das abschließende Kolorieren geschieht elegant am Computerbildschirm. Der großzügig bebilderte Workshop lässt keine Fragen offen. Gefunden im Agenturblog und bei Boingboing.
Phase 2, die Tuschezeichnung: »I make my way down the page from left to right, not necessarily in order, but in a way I can avoid running my drawing hand over the ink. Using the dip pen also means that the ink dries very slowly. Only a few years ago, this page would have been covered in process white to patch up all the smears left by my hand.«
Phase 3, das digitale Kolorieren: »I begin the coloring process by going to Image>Mode>CMYK to make it a CMYK file, then I create two new layers. By double-clicking the background layer (the original scan) you can turn it into a regular layer and bring it to the top. I also rename it to keep things clean. Setting the linework layer to "Multiply" will allow for the white areas to become see-through while the blacks will stay visible.«
Der fertige Comic
Kazu Kibuishis Blog Boltcity ...
Der Schritt-für-Schritt-Workshop ...
Copper im Internet
|