Faszinierend: Wie ein Comic entsteht
Der kalifornische Comiczeichner Kazu Kibuishi erläutert in
seinem Weblog Boltcity Schritt für Schritt die Entstehung einer Seite
seines Copper-Comics. Kibuishi teilt seinen Job in drei
Werkzeugphasen ein: Stift, Tusche, Computer. Am Anfang steht eine grobe
Bleistiftskizze, die er anschließend als Blaupause auf
»Bristol«-Papier überträgt. Mit Tusche entstehen zuerst
Sprechblasen, dann Rahmen und schließlich die Figuren. Weiterlesen ...

Dann digitalisiert Kazu Kibuishi den gezeichneten Comicbogen ziemlich
umständlich mittels Flachbettscanner (6 Durchgänge) zu einer 4500 x
4500 Pixel großen PhotoShop-Datei. Das abschließende Kolorieren
geschieht elegant am Computerbildschirm. Der großzügig bebilderte
Workshop lässt keine Fragen offen. Gefunden
im Agenturblog und bei Boing Boing.

Phase 2, die Tuschezeichnung: »I make my way down the page from left to right, not necessarily in order, but in a way I can avoid running my drawing hand over the ink. Using the dip pen also means that the ink dries very slowly. Only a few years ago, this page would have been covered in process white to patch up all the smears left by my hand.«
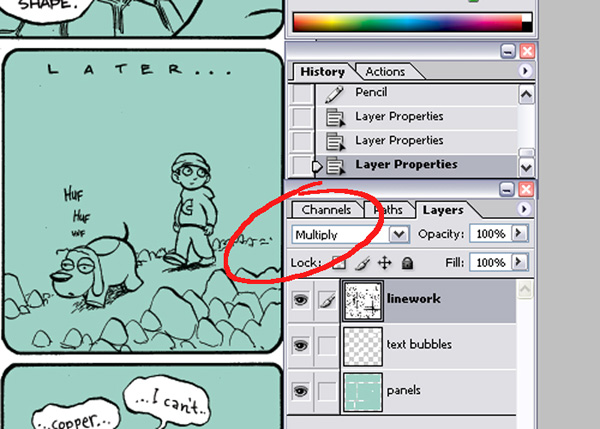
Phase 3, das digitale Kolorieren: »I begin the coloring process by going to Image>Mode>CMYK to make it a CMYK file, then I create two new layers. By double-clicking the background layer (the original scan) you can turn it into a regular layer and bring it to the top. I also rename it to keep things clean. Setting the linework layer to "Multiply" will allow for the white areas to become see-through while the blacks will stay visible.«
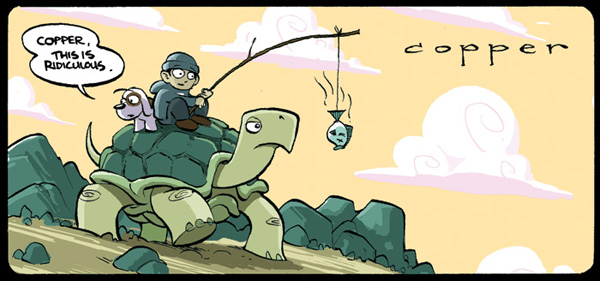
Der fertige Comic
Kazu Kibuishis Blog Boltcity ...
Der Schritt-für-Schritt-Workshop ...
Copper im Internet
Phase 2, die Tuschezeichnung: »I make my way down the page from left to right, not necessarily in order, but in a way I can avoid running my drawing hand over the ink. Using the dip pen also means that the ink dries very slowly. Only a few years ago, this page would have been covered in process white to patch up all the smears left by my hand.«
Phase 3, das digitale Kolorieren: »I begin the coloring process by going to Image>Mode>CMYK to make it a CMYK file, then I create two new layers. By double-clicking the background layer (the original scan) you can turn it into a regular layer and bring it to the top. I also rename it to keep things clean. Setting the linework layer to "Multiply" will allow for the white areas to become see-through while the blacks will stay visible.«
Der fertige Comic
Kazu Kibuishis Blog Boltcity ...
Der Schritt-für-Schritt-Workshop ...
Copper im Internet
Herausgegeben: Do - Februar 2, 2006 at 04:09 nachm. |
Quick Links
Suche
Fontblog Bildmemo
Kalender
| So | Mo | Di | Mi | Do | Fr | Sa |
Archiv
Rubriken
Statistik
Total entries in this blog:
Total entries in this category:
Published On: Aug 01, 2007 02:43 nachm.
Total entries in this category:
Published On: Aug 01, 2007 02:43 nachm.